Happy Saturday
Everyone!
I have received
several questions from friends and online buddies on how to create Digital
Scrapbook Pages but once I tell them that I use Adobe Photoshop: they seem to
lose interest..
Well, I understand…
Adobe Photoshop sounds too difficult.
But there’s a very
easy way to create your own DS and that is by using our friendly MS tool..which
is…
Microsoft Powerpoint.. yup..
Powerpoint.
I found out that I can create DS using this
tool when my Adobe PS crashed.. and I was desperate to make a Birthday page for
a friend..and I was not disappointed with the outcome.
Here’s my simple
tutorial…
STEP 1
Open your MS Powerpoint
STEP 2
Choose Layout then click BLANK
STEP 3
Open a Background Paper.
Note: Like what I’ve mentioned in my previous tuts, set a
layout/design in mind so that you won’t have a hard time executing it
Download freebie kits here...
STEP 4
I will open a new paper and will layer this as an
embellishment.
How to crop?
Go to the Crop Tool on the upper portion of your screen.
Once you see the Crop Edges, crop as desired.
STEP 5
Assemble your added embellishments
I added 3 new embellishments here:
1.
Green Flower
2.
Another Flower
3.
Swirl
STEP 6
Add the Picture
TIP: It will appear more appealing if you choose your color
combination using the base color in the picture that you will insert (e.g. you
are wearing red, use red paper and elements)
Okay as you can see, the picture is HUGE.
You can resize it by using the circle buttons on the edges
of the pic.. but use the upper right button so you won’t end up distorting the
image.
Here’s my desired size..
STEP 7
Re-arranging Layers
If you noticed, the image is blocking the embellishments.
You can move the image backwards by using the Selection Pane
Click the button on the lower right side of your screen to
re-arrange layers.
You now have the picture behind the embellishments
STEP 8
How to Tilt images or embellishments
Easy.. just click on the green circle and it will let you tilt the
image
STEP 9
Editing the Picture.
Go to Picture tool then click Contrast or Brightness.
STEP 10
Adding wordart.
Go to HOME the insert Wordart
You can choose the font by going back to HOME then choose
your desired font.
And here’s my finished layout
STEP 11
Saving the image as JPEG.
You need to click the Slide Show icon.
Once you see the page, click PrtSc (PRINT SCREEN) on your
keyboard.
Open PAINT (in the Accessories of Windows) then hit CTRL V.
Save the File as JPEG
STEP 12
Finalizing the DS
Open the image using Microsoft Photo Editor.
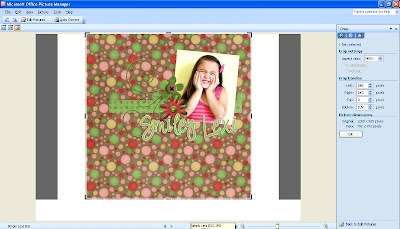
Click Crop then crop the unnecessary edges
Once done, save the image…
TA DA!
Here’s the finished DS.
It’s very simple but
pretty.. right? J
Hope this tutorial
helps!
If you have any
question/comments, please click on the comment button below.
UPDATE 09AUG12
You can also skip the whole Printscreen part by doing SAVE AS JPEG!!!
Soooo much easier!
UPDATE 09AUG12
You can also skip the whole Printscreen part by doing SAVE AS JPEG!!!
Soooo much easier!


No comments:
Post a Comment